Installation
To install the Reverse Speech Pro Video software, simply download the installation file called RS_Video_Setup_V1.msi, you can do that here, and Save the installation file to your Downloads folder. Once the installation file has completed downloading, then you simply double-left click on the installation file and follow the prompts.
The first time you open the Reverse Speech Pro Video software from the Desktop icon, it will ask you to input your Email Address and your License Code. Be sure to have these two pieces of information ready and available.
NOTE: Windows PC Version 8.1 or above. At this time we cannot support Apple/Mac systems.
Opening A Video
To open a video for analysis, double-left click the Desktop icon for Reverse Speech Pro Video at which point a Mini File Explorer will open so you can select the video. See below.
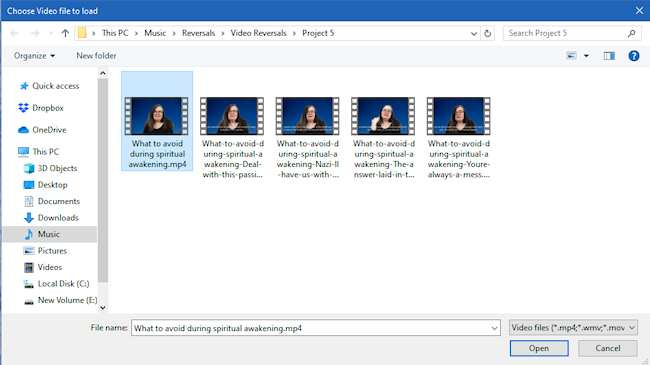
Select the video you wish to open by Highlighting it as in the above image and then select Open. Alternatively, double-left clicking on the video will also open the video.
The first time you open a video in the RS Pro Video software it will take a long time to open. The software has to extract a single image for every frame of the video, then extract the audio, and place it all in a temporary file. The faster your computer processor and the more RAM memory you have the faster it will open. After initially opening the video, if you close the video and software, the next time you open the video and software it will open almost instantaneously. If you close out the video and software, open a different video, then go back to the first video, you will have to wait the extended time again to open the video as the temporary file is dropped when you move to another video. The word to the wise is to complete the analysis of your first video before moving on to another video.
CONSIDERATIONS:
- RS Pro Video supports four(4) video formats: .WMV, .MP4, .AVI, .MOV.
- Formats .AVI and .MOV are usually very large files and will take much longer to open than .WMV’s or .MP4’s.
- At this time you cannot open multiple instances of the RS Pro Video software.
- The RS Pro Video creates a system file with the file extension of .RSVideo to go with the video you are working on. If you move the video file or the system file without the other, you will lose your work.
NOTE: The Reverse Speech Pro Video software will not open unless you select a video to open.
Analysis Method
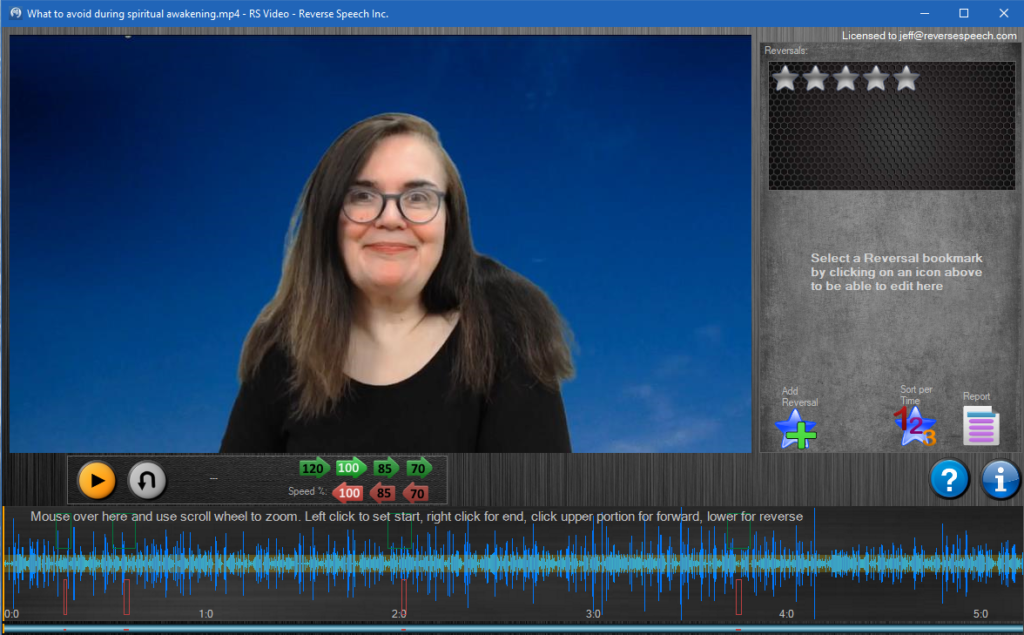
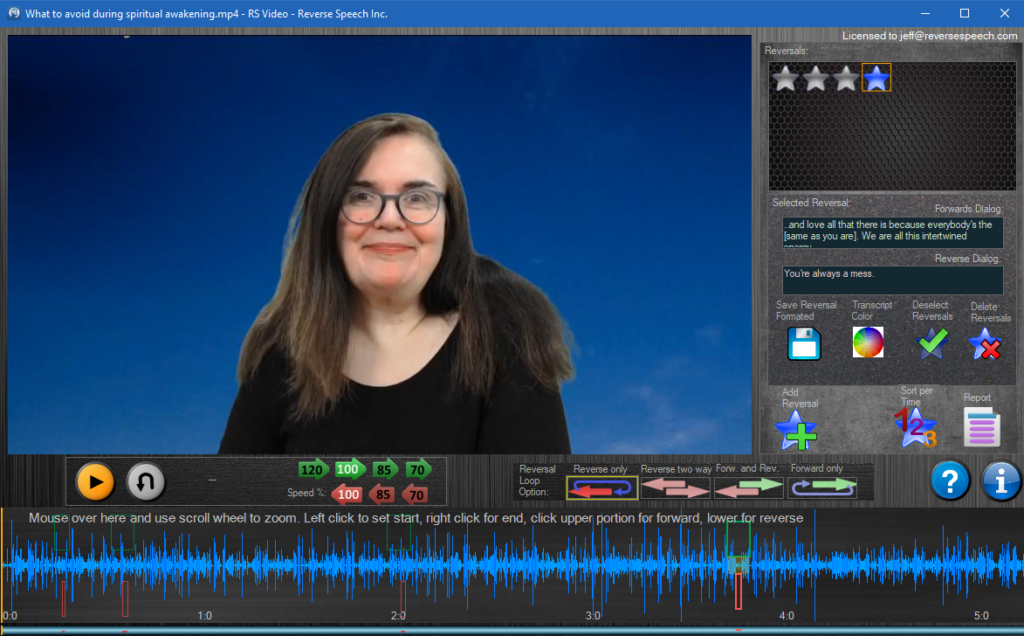
Once your video has opened, you can run the video/audio forwards and backwards by using the Play/Pause button and the U-Turn or Reversing button in order to find an example of Reverse Speech. But first, you must understand that the RS Pro Video software has two(2) modes. The ANALYSIS MODE and the REVERSAL MODE. You must be in the Analysis Mode to search for and analyze the video/audio for Reverse Speech examples and then, you must be in the Reversal Mode in order to bookmark and save your examples. The images below shows the RS Pro Video software first in the Analysis Mode and the second image is of the RS Pro Video in Reversal Mode.
To run the video/audio forwards and reverse, you must be in the Analysis Mode and you make sure you are in that mode by checking to see if the Deselect Reversals button is not there. If the Deselect Reversal button is there, then you must click on that button to deselect the reversals and switch to the Analysis Mode.
If you have found an example of Reverse Speech that you wish to save out as a single example, then you must enter the Reversal Mode and you do that by pressing the Add Reversal button. Once you are in the Reversal Mode you are then able to bookmark your speech reversal and the forwards to go with it and then save the example to its own file by selecting the Save Reversal Formatted button.
SPEED CONTROLS: You will see there are speed controls provided for ease of analysis. The four(4) green arrows that point right are forward speed selections, 120%, 100%, 85%, and 70% of speed are provided. The red arrows that point left are reverse play speeds, 100%, 85%, and 70% of speed. These speeds are the industry standard for Reverse Speech.
JUMP BAR: If you look closely at the Waveform Display Window below, through the center line behind the waveform lines you will notice an Olive Green bar that runs horizontally the full length of the waveform display window. A Left Click on this Olive Green bar while in Analysis Mode will play the video/audio Forwards from the point you clicked on. If you Right Click on this Olive Green bar, the video/audio will start playing in Reverse from the point you clicked on.

ZOOMING: Zooming is accomplished by placing your Cursor over the Waveform Display Window and using the scroll wheel on your mouse to zoom or zoom out.
TIME INDEX: The time index is located at the bottom of the Waveform Display Window and is in minutes and seconds. Seconds are measured either plus seconds or minus seconds from the nearest minute mark.
Bookmarking
So, you have searched and found an example of Reverse Speech that you would like to save out as a single example. The first thing you must do is switch out of Analysis Mode to Reversal Mode by selecting the Add Reversal button. Once you press that button the RS Pro Video software will switch to the Reversal Mode and create a Blue star in the upper right hand column of the software. This blue star will represent the reversal example you are about to create. You will also see a few more features added into the software at this point.
Bookmarking has been greatly simplified in RS Pro Video. If you look at the Waveform Display Window (above) notice there is the Upper Half and the Lower Half of the Display Window. The upper half is where you can bookmark your Forwards speech, in green, and the lower half is where you can bookmark your speech Reversal, in red. Creating the bookmark is as simple as Left Click where you want your Left Border and Right Click where you want your Right Border. This applies to both the upper half for the Forward Bookmark and the lower half for the Reversal Bookmark. Once you have your bookmarks finalized, you will want to next type in the Forwards Dialogue and the Reverse Dialogue into the proper text boxes in the upper right column of RS Pro Video software.
Transcript Color
This feature was added so that you may select a color for the text in the video that will show up against the background of the video. For example, if you had a white background in your video and the text was white, then you would be unable to read most of the text in the video example you created. So you will have to check what the general color of your background is in the video you are dumping examples from and pick a color that will contrast enough to be read. You can select the color by simply pressing the Transcript Color button. Your color choice does not apply to the printed transcript, only the color of the text in the video.
Reversal Loop Option
You will notice that when you switch to Reversal Mode in the RS Pro Video software that four(4) new buttons appear in the center bar of the software. These buttons are there to assist you with finalizing and accurately bookmarking the forwards and reverse bookmarks. They are as follows:
- Reverse Only – selecting this button allows you to play what you have bookmarked in the lower half over and over, it loops just the reverse play.
- Reverse Two Way – selecting this button allows you to play what you have bookmarked in the lower half in reverse then in forward over and over.
- Forward & Reverse – selecting this button will play the video/audio as it will be saved into a properly formatted example per your bookmarking.
- Forwards Only – selecting this button will play the forwards only over and over that you have selected in the upper half of the waveform display window.
Creating Your Example
Once you have your bookmarks finalized and your forward and reverse dialogue typed in, all you have to do is press the Save Reversal Formatted button and the software will create a properly formatted video reversal while adding in the forwards and reverse dialogue into the new saved video reversal example. A Mini Explorer Window will open so you can select which folder you want to save the file in and allows you to give the new file a name.
Once you have saved out your example of Reverse Speech, you will need to press the Deselect Reversals button to switch the RS Pro Video software back into Analysis Mode so that you may continue on with your analysis and find the example of Reverse Speech.
Creating Your Transcript
A great convenience of the RS Pro Video software is that it does not matter what order you do your analysis in. You can start at the beginning and work to the end, you can start at the end and work to the beginning, or start in the middle and work both directions. However, when you have completed your analysis and you want to create your transcript you will want all your examples in order of time so there is a button for that called, Sort Per Time. This button will sort your examples into their proper time order when pressed. Then once that is done you can click on the Report button and create your transcript.
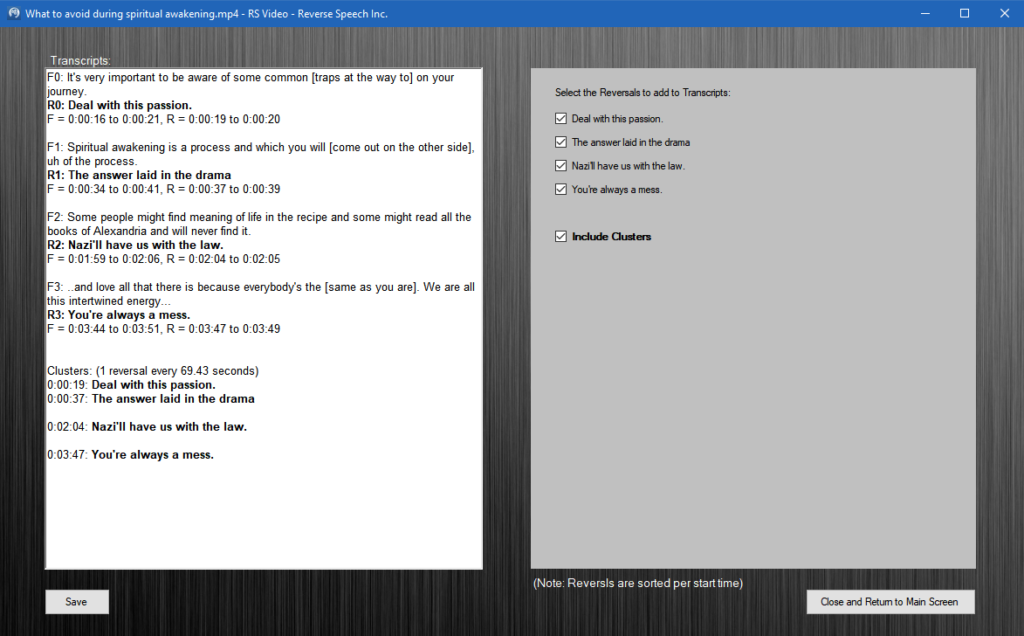
Pressing the Report button will open a new screen that will allow you to create and save your transcript to a .RTF file which is a Microsoft Word format. In this window you have the option to select which reversals you wish to use before saving your transcript and you can edit any text in this window also. Once you have selected the reversal examples you wish to use and finished editing, click on Save and save your transcript by giving it a file name and placing the file in the correct folder. The transcript creation window also has a function for Practitioners and Therapist to include clustering for analysis. Simply put a check mark in the Include Clusters checkbox and the reversals will be added into the transcript in clusters.
When you have finished creating and saving your transcript, press the button that says, Close And Return To Main Screen.
Technical Support
If you need some help or are having technical issues with the Reverse Speech Pro Video software you can email us from the Contact Page or phone Jeff at U.S. number: (503) 919-3752.